Tag Archive for: winterpromise

Are you ready for Christmas break! Are your kiddos ready for Christmas break! I know ours are!

Christmas break is great for spending time together with your family but the things we learned before can sometimes get lost in all the holiday cheer! This year if you want to keep your kiddos brains fresh try some of these fun Christmas themed activities to keep those gears turning and ready for school to start again!

Gingerbread Cookies & Houses

Decorating cookies isn’t just so that you can eat the icing while decorating or gluing together walls, although that is the best part! Decorating cookies and making gingerbread houses is a great way for your students of any age to focus on something fun while building a number of important life skills! For your youngest learners decorating cookies and making gingerbread houses can be a great way to practice color recognition, strengthen their fine motor skills, and help lengthen their attention span by focusing on something fun! For older or middle aged learners these activities can help in similar ways! Decorating cookies can allow your students to express themselves visually as well as allow them to practice being an architect by figuring out the best way to keep the gingerbread house together and stable!

Popsicle Stick Christmas Trees

If you have learners that like more creative freedom and love hands-on crafts, try making popsicle stick Christmas trees! The wonderful thing about this project is that there is no right or wrong way to make the Christmas tree! You can make a simple triangle with the sticks and decorate it with pom balls, string, markers, glitter and more! Or you can place one large stick and place more sticks perpendicular to that stick getting smaller as they reach the top of the stick, and you could even choose designs that might be harder to complete like placing many smaller sticks at the top of the tree pointing toward the bottom of the tree in a fan like pattern!

Take these fun popsicle stick Christmas trees and turn them into Christmas decorations that you can hang on your Christmas tree!

12 days of Christmas
Our I’m Ready to Learn Themed program for Preschoolers goes through the 12 days of Christmas song and even walks you through creating your own 12 days of Christmas book to read and play with over Christmas break while you count down the days! Try making your own 12 days of Christmas book or use our I’m Ready to Learn Preschool program to walk you through it as you complete a full year of preschool at home!

Write Christmas Cards Together!

Write Christmas cards together this year with all your learners! For younger students this is a great way to practice writing letters and spelling and writing their own name. For older students this is a great way to help them understand what should be written on card and how you should write an address on a letter as well as how the stamps are used! You could even take them to the post office to send them out for a fun family outing!

This year make sure you take a break to spend the holidays with your family and listen to your instincts as a parent! If you feel your kids need a break then give them one, but if you feel they should keep their brains fresh for when you start school again then try some of these fun engaging holiday themed activities that will get their brains working without them even knowing!

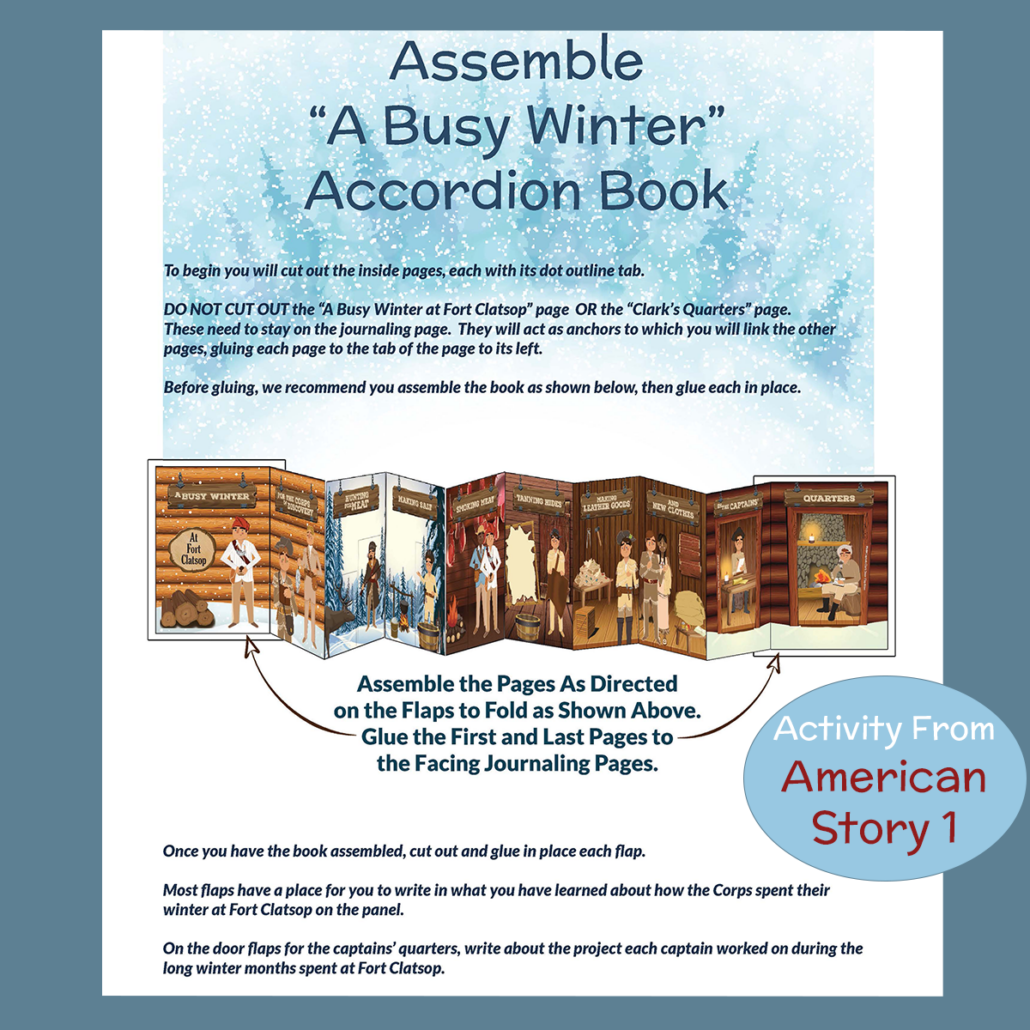
Create your own “Busy Winter” accordion book!

This accordion book is a great hands-on activity for students studying or interested in American History! While creating this book your students will learn all about the busy winter Lewis and Clark faced years ago in Fort Clatsop! Students learn how they got their food, cooked their meals, made new clothes, and even what their living quarters looked like!

Once students have glued down their pages they can go through and answer questions and glue on informational flaps that tell you more about what their winter was like!

Keep reading to see some instructions and download the pages you’ll need to complete this fun activity!

Instructions:

First: Glue together your pages with the side flaps. Make sure not to cut the first and last page! 

Second: Fold each page along the crease where the flap meets the colored picture. Make sure you are folding each page opposite of the way you folded the last one so that the spread opens up in an “accordion-like” fashion. 

Third: Have your student complete the fillable text sections and glue on flaps for doors, pictures, and other cute flaps with more information on how their life was; and finally enjoy learning about what life was like in Fort Clatsop!

Once you’ve finished, we’d love to see the accordion books your students have made! If you’re comfortable feel free to share your experience with this activity on our WinterPromise Village Square Facebook page!

Did you know the first Friday in June is National Donut Day?

Do you know who started National Donut Day? National Donut Day was started by the Salvation Army in 1983 to honor the “donut lassies” who served sweet treats and provided assistance to the soldiers on the front lines of World War I!

The donuts they served in World War I were a little different than the ones we see in bakeries today. They weren’t serving too many different flavors then because they needed to make way more than a dozen and had to use pretty cheap ingredients! Even though they might not have a Boston Creme or a Strawberry Frosted, they were still delicious!

This year you could even try making this simple Salvation Army Donut recipe to try them for yourself!

Salvation Army Donuts

Makes 2 dozen.

Ingredients:
  • 1 large eggs
  • 1 cups flour
  • 1 cups sugar
  • 2 1/2 teaspoons baking powder
  • 1/8 tablespoon salt
  • about 3/4 cup milk (may need a little more if mixture is not coming together)
  • 1 tub lard (or oil) enough to fill a deep pan.
  • 1 cups powdered sugar

Directions:
  1. Combine all wet ingredients (except for lard and milk) then stir in dry ingredients with milk to form the dough.
  2. Thoroughly knead the dough. Then roll out until about 1/4 inches thick. Cut rings from the dough. (Be creative when you are cutting the circles! You could use a cup, cookie cutter, or even a sauce bowl! The “donut lassies” didn’t use one tool for this they used many different things they could find that were available!)
  3. Heat up your lard/oil in a large and deep pan. Once the lard/oil is boiling drop the rings into the lard/oil a couple at a time. Turn the donuts slowly multiple times until they are golden brown on both sides.
  4. Remove the donuts and place them on a cooling rack, some paper towels, or someplace where the excess lard/oil will be removed from the donut.
  5. Dust with powdered sugar once enough lard/oil has been removed from the surface that way the powdered sugar will form an icing on the donut. Let cool and enjoy!

Let us know if you and your family try these donuts!  This activity is a great chance for kiddos to learn more about World War I!